IRON NEST Demo Walkthrough: A Verification-First Firing Guide
A spoiler-light IRON NEST demo walkthrough for reading orders, plotting targets, calculating elevation, loading correctly, firing and diagnosing misses.
The free IRON NEST demo is best approached as an operating lesson, not a speedrun. Its purpose is to reveal whether you enjoy turning military reports into a shot through several physical stations. This walkthrough explains that repeatable loop without inventing a fixed mission count, completion time or save-transfer promise that the current official listings do not make.
Demo builds can also change independently from the released full game. Before following any exact prompt, check the version and operation list visible in your installed copy. If an instruction here conflicts with an on-screen tutorial, follow the build in front of you. The durable skill is understanding the information chain.
Before accepting an operation
Give yourself an uninterrupted first session. IRON NEST is intentionally poor at supporting casual guessing because every later action depends on earlier notes. Turn subtitles on if needed, check sensitivity and graphics settings, and identify the stations before trying to work quickly.
Find the incoming-information area, tactical map, ballistic calculator, ammunition and loading controls, elevation and traverse controls, and firing mechanism. You do not need to memorize every switch. You do need a mental route through the room. The simplest route follows the data:
- receive the order;
- identify the target;
- measure range and bearing;
- choose ammunition and a valid charge;
- calculate elevation;
- load and lay the guns;
- fire;
- read the result and correct one cause.
Keep a written or in-game note of the current target, range, bearing, ammunition, charge and elevation. Old values are dangerous because a plausible number copied from the previous target can produce a confidently wrong shot.
Step 1: read the entire order
Do not run to the gun as soon as one coordinate appears. Read the complete message and separate facts from tasks. A report may identify an observer rather than the target, provide a bearing without a distance, or distinguish a primary objective from secondary information. Copy units and direction exactly.
Ask four questions: What must be affected? Where did this information originate? What geometry does the report describe? Is there a time or ammunition constraint? Those questions prevent the most common conceptual error—treating every number as though it were already the target’s range from the Iron Nest.
If multiple reports describe one target, keep them together. A bearing from one observer becomes useful when it intersects another bearing or a distance arc. The tactical map guide explains the individual plotting tools in detail.
Step 2: construct the target on the map
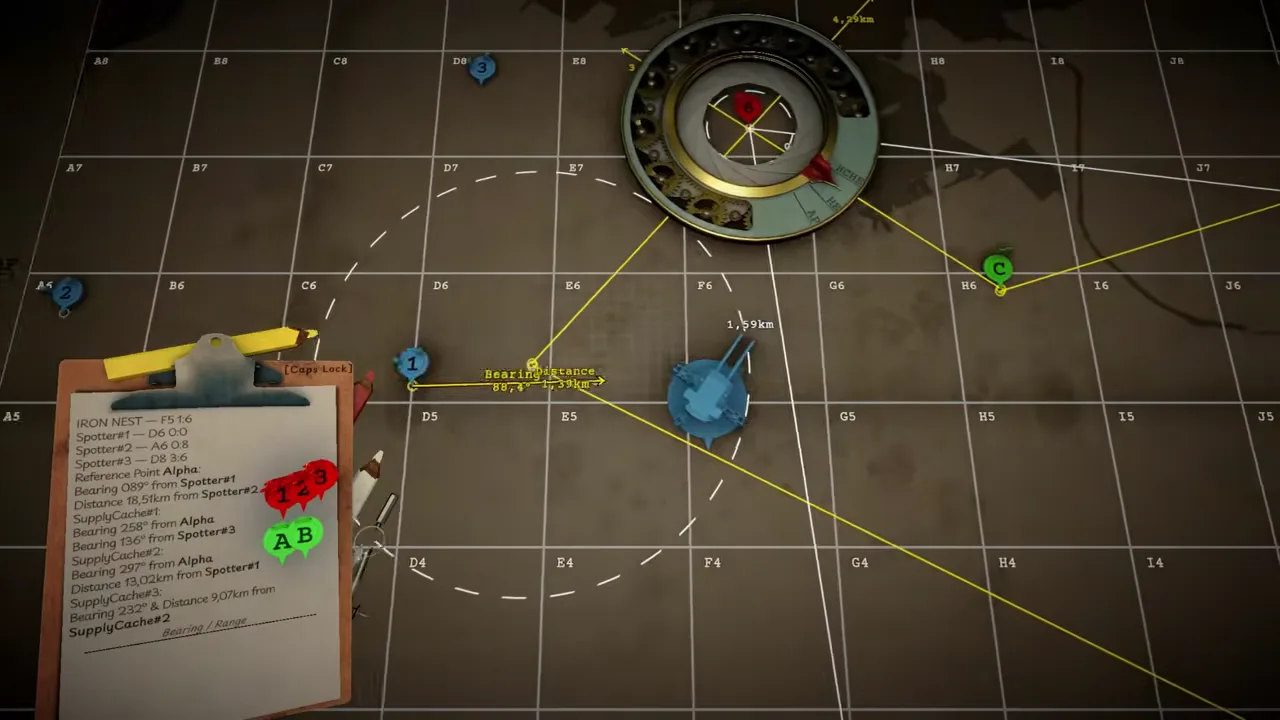
The tactical map converts testimony into geometry. Mark known points first: the Iron Nest, named spotters and any coordinate explicitly identified as a location. Then represent each report from its true origin.
A bearing is a ray extending from the reporting observer in the reported direction. A distance is a circle or arc centered on the observer. Two independent constraints create possible intersections. The target is not automatically the nearest point or the middle of a shape; use every report and operational context to reject an impossible intersection.
The official demo video frame above shows why this is a working surface rather than a conventional minimap. Colored observer markers, lines, arcs, handwritten values and a physical compass coexist. Clarity matters. Use consistent colors if the tools allow it, remove abandoned constructions and label the final target before measuring from the turret.
Once the target is fixed, draw or measure from the Iron Nest to that point. This final line supplies the gun’s bearing and range. A spotter-to-target distance is not interchangeable with a turret-to-target range.
Step 3: choose the shell before finalizing the solution
IRON NEST’s full release advertises numerous ammunition types and abilities, but a demo may expose only a subset. Use the labels and documentation present in the installed build. Match purpose rather than choosing the most dramatic name.
The target description should drive the decision: armor, personnel, structures, concealment or another stated effect. Different projectiles may require different ballistic data. If you change shell family after calculating, recalculate instead of assuming identical performance.
This is also where you should preserve scarce or specialized rounds if the operation suggests later stages. Do not infer that a secondary target deserves the same expenditure as the primary objective. Our ammunition guide separates confirmed general principles from page-specific legacy entries that are still undergoing version 1.0 verification.
Step 4: convert range into charge and elevation
The calculator does not replace judgment; it formalizes inputs. Enter the measured range, select the relevant ammunition data and establish a valid powder-charge setting. Then read the elevation result carefully, including scale and precision.
Charge and elevation form a pair. A lower charge usually needs a different elevation from a higher charge to reach the same horizontal distance. Copying the angle while changing the charge breaks the solution. The powder charges and elevation guide explains this dependency without inventing a universal lookup table.
Perform a verbal or written checksum before leaving the station: target, range, shell, charge, elevation, bearing. If a value sits near the edge of a displayed table or a mechanism refuses it, return to the measurement instead of forcing the control.
Step 5: load deliberately
Loading is a state machine. Confirm that the mechanism is ready, the intended projectile is selected, and the powder configuration matches the calculation. Operate interlocks in the order demonstrated by the current tutorial and use gauges or lamps as confirmation rather than relying only on animation.
Do not click faster when a mechanism stops. A refusal usually means a required state has not been reached. Look for an open breech, an unfinished ram cycle, a selector left between positions or a safety condition. Randomly toggling controls creates multiple unknowns and makes recovery harder.
When twin-gun operation becomes relevant, treat each side as independently verifiable. A correct left-gun state does not prove the right gun shares its shell, charge or elevation. The principle is simple: no firing until the physical state matches the written solution.
Step 6: lay bearing and elevation
Traverse aligns the weapon horizontally; elevation aligns it vertically. Move each control toward the recorded value, approach the mark with care and confirm the final indication from the correct scale. Large machinery may have delay, momentum or coarse and fine controls, so stopping input is not always the same as stopping motion.
Recheck direction conventions. A mathematically correct bearing interpreted on the wrong reference or turned the wrong way still misses. If the turret has moved since the map measurement, determine whether the displayed position and tactical reference remain valid before reusing old values.
Experienced operators save time by planning rotation while solving other tasks, but a first run should prioritize a verified endpoint. Speed is useful only when the gun arrives at the intended bearing.
Step 7: fire and preserve the evidence
Before firing, conduct a final independent check:
- the selected target matches the current order;
- shell and charge match the calculator setup;
- elevation is set on the correct gun;
- traverse matches the turret-to-target bearing;
- loading and safety indicators show readiness.
Then fire and resist the temptation to immediately alter everything. The outcome is new information. Record what was actually set at the moment of firing, not what you intended to set. An aerial image, report or impact indication can only diagnose the solution if the initial state is known.
Step 8: correct a miss scientifically
First decide whether the error is lateral or in range. A consistent left/right miss points toward bearing, target plot or traverse. A short/long miss points toward range, charge, elevation or projectile data. A wildly unrelated impact suggests a transcription error, stale solution or wrong target rather than a tiny adjustment.
Change one uncertain variable at a time. If you redraw the target, change the charge and nudge elevation together, the second impact cannot reveal which correction mattered. Use our complete why firing solutions miss checklist when the error survives one careful recalculation.
Under counter-battery pressure, the movement rules matter. The developers described two forms before release: moving to a specific selected location can buy time without stopping the incoming-fire timer, while an emergency reposition can pause that timer at the cost of an initially unknown position and a required recalculation. Treat the exact behavior in the current demo as authoritative, and see counter-battery troubleshooting for the evidence status.
What the demo can and cannot tell you
The demo can establish whether you enjoy the core labor: reading, plotting, calculating, loading and checking. It can show the atmosphere and the relationship between physical controls and imperfect intelligence. It cannot necessarily demonstrate the complete campaign, all 15 advertised regions, the full set of ammunition and abilities, more than 100 medals, both challenge modes or every post-launch adjustment.
It also should not be used to promise a specific campaign structure based on an older build. The released game currently lists a handcrafted story plus procedural objectives. A pre-release developer Q&A described an intention for many new missions to use multiple stages, primary objectives and secondary objectives, but such dated statements must be checked against the version being played.
Most importantly, do not assume demo saves transfer. Neither official listing cited here currently makes that promise. What unquestionably carries over is operator knowledge. A player who can produce a clean firing solution in the demo begins the full game with a repeatable procedure rather than a memorized answer.
A compact completion checklist
You are ready to leave the demo when you can explain why each station exists, reproduce a firing solution without copying an old number, identify the likely cause of a miss, and decide whether the deliberate pace feels rewarding. Replaying one operation cleanly is more informative than rushing through a claimed mission count.
If the loop clicks, continue with the full demo overview, first firing solution and version 1.0 overview. If it does not, that is useful too: IRON NEST is deliberately about operating the process, and the free demo exists to let the process—not a marketing summary—make the case.
Frequently asked questions
How many missions are in the IRON NEST demo?
The current official demo page confirms a free playable introduction but does not publish a durable mission count. Because demo builds can change independently of the full game, this walkthrough does not promise a fixed number. Use the operation list shown in the installed build as the authority.
How long does the IRON NEST demo take?
The official listing does not guarantee a completion time. A careful first firing solution can take much longer than a replay because the demo teaches a multi-station process. Budget an uninterrupted session and judge the demo by whether you enjoy learning the workflow, not by an unofficial hour estimate.
Does demo progress carry into the full game?
Neither current official Steam listing cited here promises save transfer. Treat the demo as a separate introduction unless an official update explicitly confirms compatibility for the build you are using.
What should I check first when a shot misses?
Verify the target plot, range and bearing first; then confirm ammunition, powder charge, calculator input, elevation and traverse. Change one uncertain value at a time so the next impact provides useful evidence.