IRON NEST Beginner Guide: Your First Complete Firing Solution
A source-led beginner walkthrough from teleprinter order and map plotting to charge selection, gun laying, firing and outcome review.
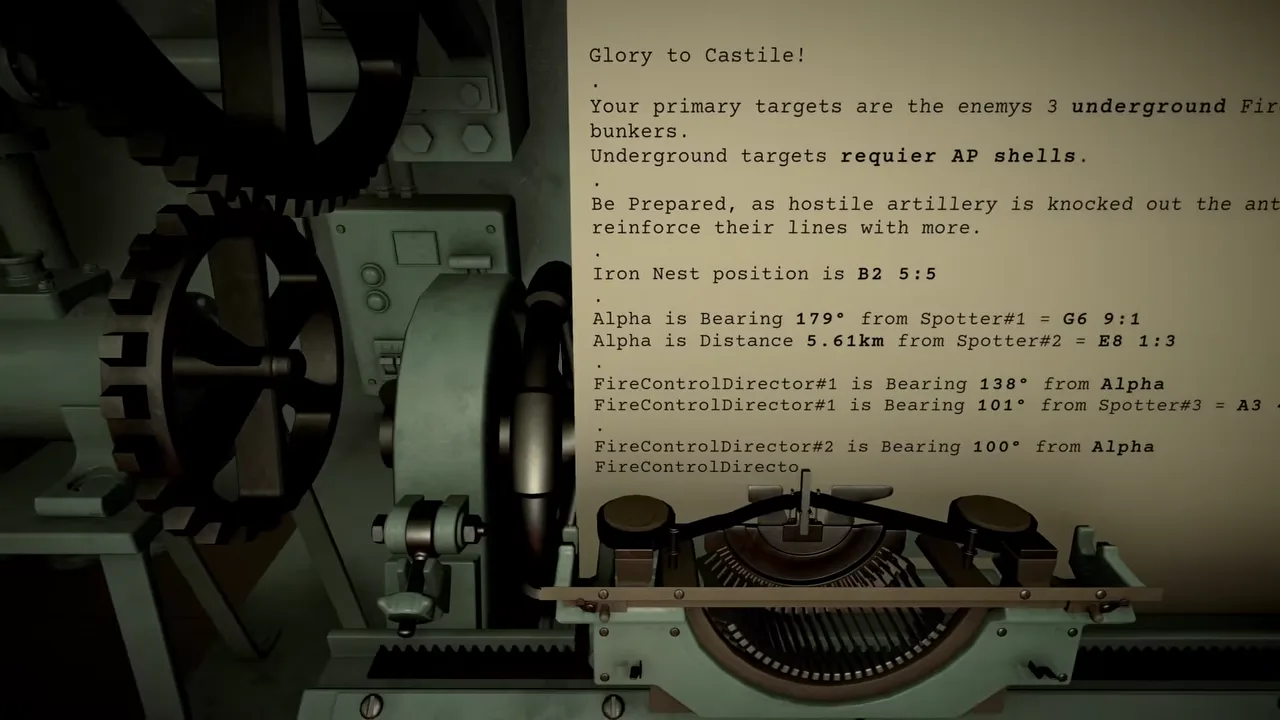
Your first successful shot in IRON NEST: Heavy Turret Simulator is not one clever calculation. It is a sequence of ordinary checks performed in the right order. A teleprinter supplies the objective, the tactical map establishes location, the ballistic calculator links range and powder charge to elevation, and the gun controls make the machine match that solution.
Beginners often focus on the last lever because firing is dramatic. Most unexplained misses begin earlier: a bearing drawn from the wrong observer, a range measured from the spotter instead of the turret, or an elevation calculated for a charge that was never loaded. The aim of this guide is to make every handoff visible.
The frame above comes from the official demo trailer and shows the kind of operation order that begins the process. Its particular coordinates and targets belong to that video; do not copy them into another mission. Copy the method.
Before touching a control: identify the job
Read the complete directive. Record the objective or target label, target type, any turret coordinate, every named observer and the relationship each report describes. The official Steam page says one teleprinter carries top-priority directives from High Command while another relays frontline calls. More than one source of information can matter.
Do not reduce the order immediately to a single number. Target type affects ammunition purpose. Observer bearings or distances may be clues used to locate a target rather than values that belong in the gun. A later warning may create time pressure or a secondary objective.
Keep the original paper available until the outcome is confirmed. It is the first link in the audit trail.
Step 1: separate known positions from relationships
A coordinate gives a position. A bearing gives direction from an origin. A range gives distance from an origin. Label each item accordingly:
- IRON NEST position: a map coordinate.
- Spotter 1 position: another coordinate.
- Target Alpha: bearing from Spotter 1.
- Target Alpha: distance from Spotter 2.
The labels prevent a common mistake: using the 10-kilometer observer-to-target distance as though it were the turret-to-target firing range. Both numbers may be called “range,” but their origins make them different measurements.
If the order gives a target coordinate directly, the reconnaissance problem may be shorter. You still need to measure from the turret.
Step 2: locate the target on the tactical map
Transfer every known position to the map. If observers report bearings, draw each line from its named observer. If a report gives distance, apply that distance around the correct origin. The intersection or supported overlap identifies the target.
The developer’s May 2026 Q&A described this kind of forward-reconnaissance problem and also discussed observation uncertainty. Treat exact inputs exactly first. If lines do not meet, check coordinates, digits and direction before attributing the difference to uncertainty.
Mark the result with the target label. Colored lines help distinguish observers, but the current game’s controls determine which tools are available. Our tactical map guide covers bearing and range geometry in detail.
Step 3: measure from IRON NEST to the target
Now start the firing problem. Draw or measure one relationship from the turret’s current position to the target marker. Record its bearing and distance together.
This bearing tells the turret where to face. This distance is the range that belongs in the ballistic calculator. A useful note reads:
Target Alpha — bearing [value] — turret range [value]
Avoid unlabeled scraps such as “8.32.” If the turret relocates, both values become stale because their origin has changed. Re-establish the turret position and measure again.
Step 4: choose ammunition by required effect
The official store description provides clear examples of purpose: armor-piercing rounds breach bunkers, smoke can screen friendly withdrawals, and phosgene gas is presented as a morally charged specialist option. The correct shell is the one that produces the mission’s required effect at the target.
Do not choose solely by habit. A shell can land at the correct coordinate and still fail an objective if its effect is wrong. Read the directive and any protocol card, then keep the shell type on the same line as the target solution.
The store advertises 30 unlockable ammunition types and abilities, but a beginner does not need to memorize all of them before the first shot. Learn the choices actually available in the current mission.
Step 5: use the ballistic calculator
Enter the turret-to-target distance, not a reconnaissance range. Select the intended number of powder charges, then operate the control that returns required elevation. The official calculator interface makes this relationship explicit.
Write the elevation beside the selected charge:
Target Alpha — charge [value] — elevation [value]
The pair is inseparable. If the charge changes, recalculate. If the range changes, recalculate. Do not keep an old elevation because it looks close.
The game supplies this instrument so ordinary missions do not require players to derive exterior-ballistic equations. Our ballistic calculator guide explains the interface and its evidence limits.
Step 6: configure the physical gun
Move to the loading and gun-laying stations. Confirm the intended shell is selected or loaded and that the physical powder charge matches the calculator input. Then set the final turret bearing and gun elevation.
Pay attention to left and right gun labels. A correct result on the wrong display is still a wrong machine state. Let heavy mechanisms settle before reading their final values.
The official description emphasizes that IRON NEST takes time to rotate. Once a verified bearing is in motion, use the interval for checks that do not disturb the active solution: confirm ammunition, rewrite an unclear elevation or prepare the outcome note.
Step 7: perform a pre-fire readback
Before pulling the trigger, read the complete package:
- Correct objective and target marker.
- Bearing measured from the current turret position.
- Range measured from the current turret position.
- Shell selected for the intended effect.
- Powder charge used in the calculation.
- Same physical charge prepared at the gun.
- Elevation returned for that range and charge.
- Bearing and elevation set on the intended gun.
This takes seconds and catches errors that random correction would cost whole shots. The purpose is not military role-play; it is to prove that every station describes the same target.
Step 8: fire once and preserve the state
Operate the firing control only after the readback. Do not immediately spin wheels or change charges. Keep the solution intact until impact evidence arrives.
IRON NEST can communicate outcome through visible impact, aerial photographs, frontline messages, objective updates or later newspaper reports. The Steam page explicitly says aerial photos reveal the outcome of actions and that the map retains the scars of the battlefield.
A large explosion is not always proof that the requested effect occurred. Wait for the mission’s evidence.
If the first shot misses
Classify before correcting. A shell at approximately the right distance but off to one side points first toward target plotting, bearing or traverse transfer. A shell on the intended line but short or long points toward range, charge or elevation. A hit with the wrong tactical result points toward shell selection.
These patterns are clues, not guaranteed diagnoses. Walk backward through the recorded solution and find the first mismatch. Correct everything downstream of that point. Change one variable at a time so the next result teaches you something.
The dedicated miss troubleshooting guide contains a longer diagnostic sequence.
Beginner habits that scale into challenges
Write target identity on every note. Preserve origins for bearings and ranges. Pair charge with elevation. Cross out obsolete solutions. Use rotation time for verification. Keep the machine state unchanged until impact is understood.
These habits may feel slower than guessing during the first tutorial. They become faster because they prevent rework. The same procedure supports procedural objectives and leaderboards: unfamiliar coordinates change, but the chain remains stable.
Do not import unsupported real-world variables. The pre-release Q&A said wind and shell weight were being considered, not that every final mission uses them. Learn the released interface and respond only to information the game actually supplies.
The complete loop in one sentence
Read the order, locate the target, measure from the turret, choose the required effect, calculate with a named charge, make the gun match, fire and verify the outcome.
Once that sentence becomes a habit, IRON NEST stops looking like a room full of unrelated machinery. Every station answers one question, and your first firing solution succeeds when all of those answers refer to the same shot.
Frequently asked questions
Do I need real artillery knowledge to play IRON NEST?
No. The developer said the game supplies tools that make most required mathematics approachable. You need to follow the game's reports, map and instruments carefully rather than derive real-world artillery equations.
What information makes up a firing solution?
A dependable solution keeps target identity, turret-relative bearing and range, shell purpose, powder charge and gun elevation together through every station.
What should a beginner check after a miss?
Preserve the settings and trace the chain backward: target plot, turret origin, bearing, range, calculator inputs, loaded charge, shell and physical gun settings. Change only the first confirmed error.