Smoke Shell
Confirmed screening ammunition
What IRON NEST confirms about smoke ammunition, how to reason about a screening objective, and which duration, wind and visibility mechanics remain undocumented.
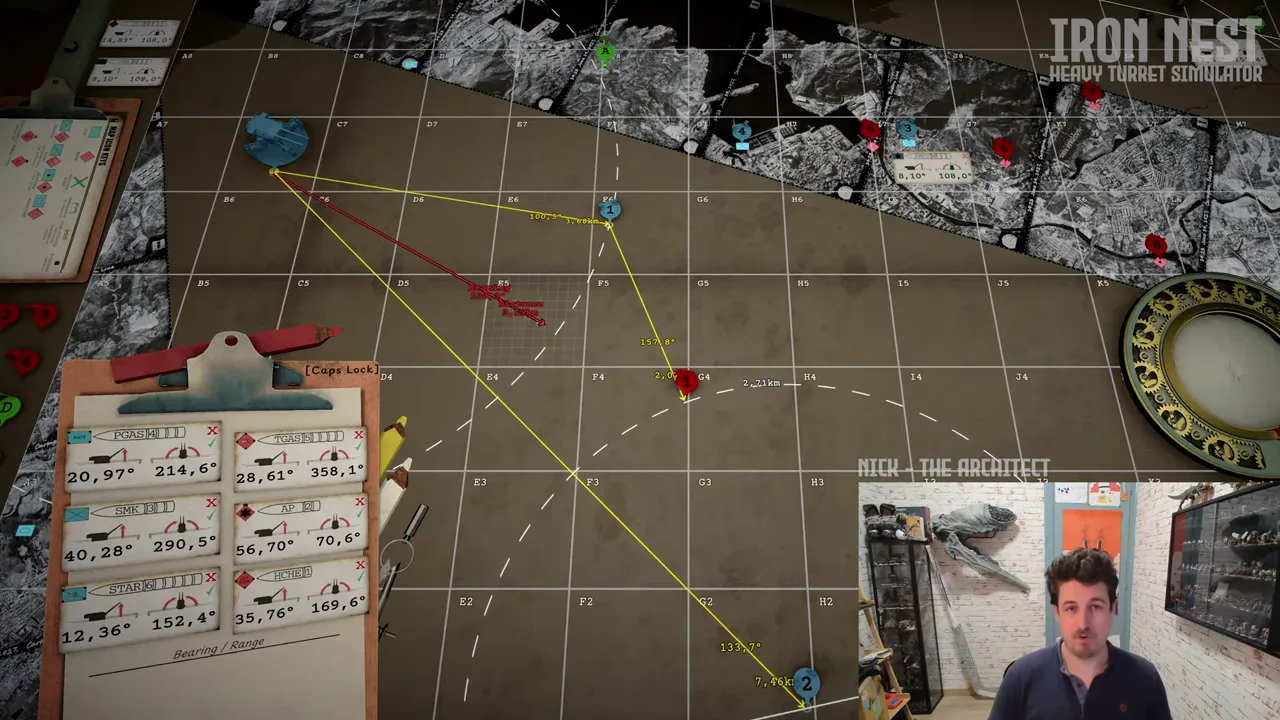
Official example: screen a friendly withdrawal.
Smoke is confirmed IRON NEST ammunition with a specific official purpose. The current Steam page and developer website say that smoke can screen friendly withdrawals. An official behind-the-scenes video also shows a firing card labeled SMK among the operator’s active solutions.
That is enough to document smoke as a tactical tool rather than a damage shell. It is not enough to publish an exact cloud radius, lifetime, wind model, line-of-sight formula or universal placement offset. This page explains how to reason from the confirmed objective while keeping those mechanics explicitly unverified.
The confirmed scenario
“Screen friendly withdrawals” tells us three things. Smoke serves friendly movement, it affects what can be observed or targeted, and its value depends on placement in relation to multiple positions. The objective is not simply to hit an enemy marker.
The scenario also distinguishes smoke from AP. Armor-piercing is connected to breaching a bunker; smoke is connected to changing the visual or tactical relationship around a withdrawal. A smoke round can succeed without destroying the point where it lands.
Do not generalize the example into a guarantee that every enemy system uses the same visibility rules. The current official description does not say whether smoke blocks all observation, reduces accuracy, breaks target locks or interacts with particular units. Let the mission text and current build define the success condition.
Think in sightlines, not target centers
A screening problem has at least three components: the observer or threat, the friendly element being protected, and the route or area through which it moves. The useful placement lies somewhere in that relationship.
In ordinary geometry, an obscurant works by interrupting a line of sight. In IRON NEST, that principle is a planning model rather than a published formula. Plot the reported enemy observation point, friendly position and movement direction. Then read the mission for a designated smoke location or other constraint before improvising your own.
The official frame above shows why the shell belongs inside the complete map problem. The SMK card sits beside the plotted observer geometry and other ammunition cards. It does not expose the game’s underlying visibility calculation, but it directly ties smoke selection to target placement and a dedicated solution.
Smoke still needs a firing solution
Utility ammunition does not remove the ballistic workflow. The operator must identify the intended location, measure range and bearing from the current turret position, use the correct ammunition data, match charge and elevation, traverse, load and fire.
The SMK card visible in official footage supports this. It has its own charge and angular values rather than a “deploy smoke” button detached from gunnery. If another shell was previously selected, recalculate. A smoke mission can fail because the cloud is tactically misplaced or because the projectile simply lands in the wrong location.
Use the first firing solution guide for the end-to-end procedure. When the target is derived from observer reports, use the tactical map guide before entering a range.
Timing without a fictional duration table
A withdrawal screen must exist when friendly movement needs it. That makes timing important even though the official sources do not publish exact persistence. Read the order for synchronization cues. If the current build shows a timer, status message or friendly movement phase, use that evidence.
Do not copy an unofficial duration into a permanent wiki table unless it is verified for the current version and conditions. Duration can change with patches, mission scripts or difficulty. Likewise, the old page’s instruction to “mind the wind” was plausible but unsupported by the official sources reviewed here. No wind simulation should be claimed without build-level evidence.
The safe operational sequence is: prepare the solution, confirm friendly readiness, fire according to the stated cue, verify placement, and watch for an objective-state update. Avoid launching so early that the operation has not begun or so late that the friendly element is already exposed.
How to interpret success
Smoke success may be reported indirectly. The friendly withdrawal can progress, an objective can update, a call can confirm concealment, or reconnaissance can show the cloud at the intended location. Preserve the fired settings and compare the visible effect with the planned screen.
If the cloud is spatially wrong, troubleshoot the trajectory. Check the screen point, range, bearing, SMK card, charge, elevation and traverse. If the cloud appears correctly placed but the objective does not progress, re-read the order: timing, target relationship or a second stage may still be unmet.
Do not evaluate smoke by explosion size alone. A spectacular detonation at an irrelevant location is a failed screen; a modest effect at the required sightline may be operationally correct.
Smoke and objective priority
In a multi-stage mission, smoke may be an enabling objective. It can support a primary withdrawal without being the final success condition. That means the operator must reserve time and ammunition for what follows.
Record the current gun state before switching to SMK. After the screen is delivered, archive the smoke solution and restore or recalculate the next target’s settings. The primary and secondary objectives guide explains how switching costs can make an apparently small supporting task mechanically significant.
If counter-battery fire forces movement, all old ranges and bearings must be reconsidered. A smoke location remains on the battlefield, but the line from the relocated Iron Nest changes. Never reuse a pre-movement SMK solution without remeasurement.
What the sources do not establish
The current official material reviewed for this page does not establish:
- a universal smoke radius or duration;
- a wind direction or dispersion mechanic;
- damage or guaranteed lack of damage;
- whether every enemy and friendly unit models visibility identically;
- how many smoke variants or unlock tiers exist;
- whether smoke affects aerial reconnaissance itself.
Some of those may be visible in version 1.0 play. They should be documented only after repeatable verification, with build date and conditions. The absence of a published rule is not evidence that the mechanic does or does not exist.
Relationship to other confirmed ammunition
Smoke’s official example is purposefully different from AP and phosgene. AP breaches, smoke screens, and the phosgene sentence is censored around the exact action while still naming the agent. The official video clipboard also distinguishes SMK from AP, PGAS, STAR and HCHE.
These categories support an effect-first ammunition selection method. Start with the required outcome, then select the card that corresponds to it. Do not rank smoke beneath damage shells merely because its result is less explosive.
The dependable conclusion
Smoke ammunition is confirmed, appears under the SMK abbreviation in official footage, and is officially connected to screening a friendly withdrawal. It remains a ballistic task: the operator must put the effect in the right place at the right time.
Treat exact duration, wind and visibility rules as version-specific unknowns until demonstrated. Build the sightline problem, follow the current mission’s placement and timing cues, verify the SMK solution from charge through traverse, and judge success by the withdrawal or objective—not by how destructive the impact looks.